
PVC Drip Irrigation is an inexpensive and easy-to-build method for watering your backyard garden. After adding a PVC drip irrigation system to your garden you can expect stronger vegetable plants, fewer weeds, and a lower water bill!
Building your own PVC Drip Irrigation System
Let me start out this post by strongly stating my opinion about drip irrigation systems. I think some type of drip irrigation system is the ONLY way to water a garden of any size. In fact, I even know market growers with “gardens” over an acre in size that use drip systems.
There are several reasons I feel so strongly about drip systems. First, they use a ton less water. Drip systems deliver water directly to the plants and don’t water all the surrounding empty space so they save water. Second, because you are only watering your plants, you are by default not watering weeds. This makes a big difference in the amount of work you have to do weeding your garden. Third, they are much more flexible in allowing you to change the configuration of your garden each year.

There are really 3 types of drip systems each has its own advantages & disadvantages:
- Kit systems that use distribution systems and tubing for individual plants.
- Soaker Hoses
- PVC Drip Irrigation systems
Kit systems are great for bigger plants.
You can run the tubing to each tomato or squash and get the water right where you want it. But kit systems are very expensive; to do a garden my size would take hundreds of dollars.
Soaker hoses are great for row crops
But they waste some water when you are dealing with larger individual plants. They are also very expensive as you have to buy a lot of hoses to water a big garden.
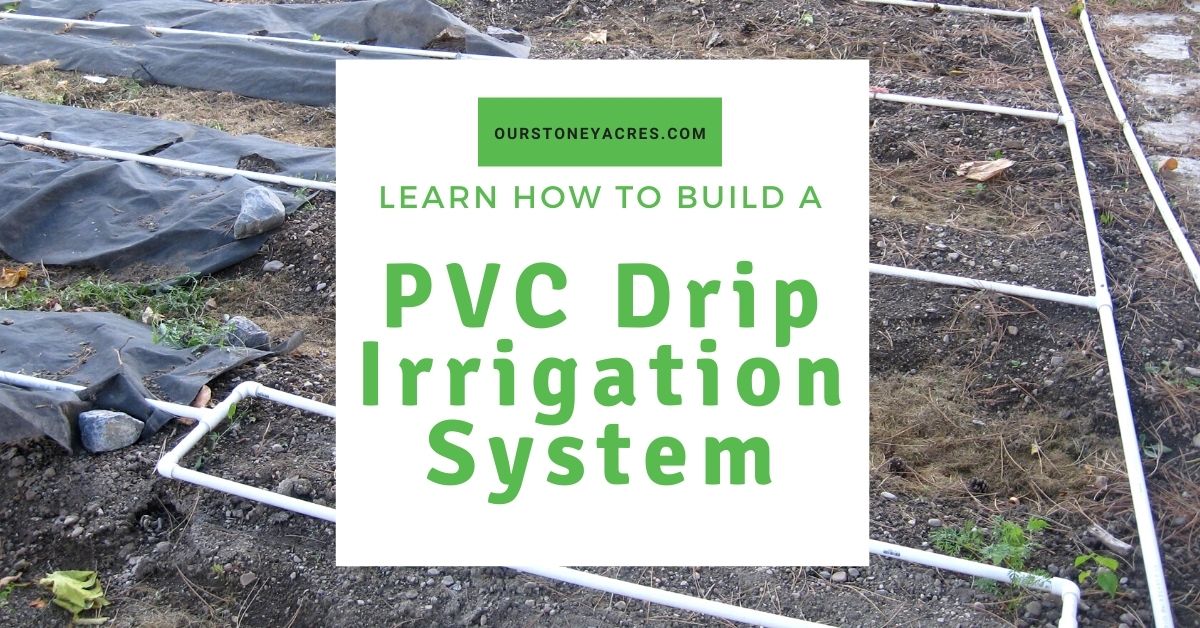
PVC drip irrigation systems are the perfect solution.
You can deal with larger plants and row crops based on the number of holes you drill in the pipes. They are cheaper to build for larger gardens. PVC systems can also be very flexible. The one disadvantage is the initial setup (the first year) can take a while because you have to drill a lot of holes in the pipe. So let’s take a look at my PVC drip irrigation system:

Here’s a shot of it covering my whole garden. Notice it works for both the row crops like carrots, peas, beans, potatoes, and corn. PVC Drip Irrigation also works perfectly for larger crops like tomatoes and squash.

Here’s a shot of the drip system we use at our second “borrowed” garden. Again it works perfectly for all the row crops we grow here. The first-time setup is easy but time-consuming. The biggest time commitment comes from having to drill hundreds of holes in the pipe. But after the first year set up and takedown of the system is quick and easy!

To get started you need pipe, several connectors, elbows and tees, a drill with a couple of small drill bits, and something to cut the pipe (a PVC pipe cutter or just a hacksaw).
What size of pipe should you use?
So let’s talk pipe first. The first PVC system I set up I used ½ inch PVC pipe. The ½ inch pipe works great for shorter lengths, but when I have to cover big long rows of 20 feet or more they don’t work quite as well.
I have now slowly started converting all my long row crops to ¾ inch pipe. Those pipes hold more water so the water seems to get to the end of the pipe a little better. So for a garden like mine, if I were to do it all over again I would use all ¾ inch pipes. If you are dealing with shorter beds, like 4 x 8-foot beds the ½ inch pipe will be fine.

For row crops, I drill a 1/16 inch hole in the pipe every 6 inches. The water from each hole soaks out about 3 inches from the center so each hole’s water meets in the middle.

For larger crops, I drill maybe 1 or 2 slightly larger holes maybe 1/8 inch right where the base of the plant is. Then when I put in my plants I form a small basin of soil around the plant to help keep the water right around the base. Then I simply lay out my watering system BEFORE I plant each year, then I know where to put the plants so they will have a water hole close by.

Most of the time I will use 2 or 3 rows of pipe in my 4-foot beds. The number really depends on the crops I am growing. So I use some 90-degree elbows and 3 sided tee’s to create a little distribution system at the top of the bed as you see in the picture above. DO NOT under any circumstance glue the pipes together. This will be a low-pressure system and the pipes will stay together WITHOUT GLUE. If you glue the pipe together then you lose the ability to move pipes around to deal with different planting configurations.
For longer stretches of pipe, I simply join the pipe with a coupling piece. Then I, of course, add an end plug on one end.


Getting Water to your System.
You can go as simple or complicated as you want to get the water into the pipes. I simply have this little connector that attaches to my hose and fits over the end of the pipe. The hose is then moved from bed to bed with the hose. I’ve found that with my longer 25-foot beds I can only water one bed at a time and still have the right amount of pressure.
You can also be more complicated and add a mainline that connects up to each bed and has a valve that you can turn on at each bed. The mainline would be under more pressure so you may want to glue those pipes. Or you could even be really fancy and add a filter system and an electronic valve box and timers. The sky is the limit!! I like having my system attached to a hose bib. That way I can control the amount of water pressure using the bib.

You want just enough water running through the pipes for it to get to the end and drip or ooze out of the pipe. If you have the water pressure up too high the water will spray out of the pipes with too much force. That will drill holes in the ground and possibly damage plants. Also, too much pressure tends to mean the water will be coming out too fast and it will run off the beds instead of soaking into the soil.
How much does it cost?
PVC pipe is cheap, over the years I have maybe spent $75 to $100 to get my system to where it is now. It waters 100% of my garden. Since going away from sprinklers and flood irrigation the amount of time we spend weeding the garden has also gone way down. Especially in the summer when there is no rain in the garden to sprout the weed seeds.
One Warning-PVC systems are not good for Hills!
Before we finish up let me give you one warning. PVC Drip Irrigation is not the ideal system to use if your garden beds have an extreme slope. My beds are pretty flat, there is a bit of a slope to the east in my garden but it is very minor. If your garden beds have an extreme slope the PVC system may not work for you.
If that is the case I would suggest buying only a few pipes for an experiment. Maybe spend $10 to see if it will work in your garden, before going crazy and buying enough pipe for the whole thing. The problem with slopes is getting even water pressure. If your slope is too severe you may have too much pressure at the bottom of the slope and none at the top! So test it out in your garden before you spend a lot of money!
My most popular post ever leads to a video course!!
To finish off I just want to say thanks for reading this post. It is by far my most popular post ever with thousands of visitors every month!! So much interest inspired me to film an instructional video course on this PVC Drip system. The cost of the course is only $29. The course is now hosted on my own video site, The Online Gardening School! If you would like to buy the course just click on the ad below!


Very nice drip system you have there, thanks for the tutorial.
Great article thank you. Can you explain more about the connector attaching to the hose, and pvc. Where did you find the connector piece?
Jo Anne, thanks for the question. You should be able to find those connectors at about any home improvement store. They have an open end on one side and the other end is threaded so that you can screw it onto the hose. The one in the photo also has a valve on it so that if you like you can shut the water off there in the garden if you like and leave the hose bib on. But I also have some that one side connects to the hose the other to the pipe. I will dig them out and take pictures.
Mr. Stoney, I have an issue not just with you but all the others who keep calling this irrigation system a drip system. IT IS NOT A DRIP IRRIGATION SYSTEM! YES, it is an irrigation system but sorry it’s not a drip system. Drip irrigation systems are a pressurized system able to irrigate slopes and depressions without a change it pressure in the system. The drippers in a drip system are designed to let out a specific amount of water in a given time … half gallon, one gallon and two gallons per hour.
Your system does not do this. It lets out an undetermined amount of water per time. I am not blasting your system. It looks like it could be the answer to many people’s needs. BUT, I’m asking you and others not to call this a drip system. It is misleading and is spreading misinformation about what a real drip system is and how they really work. Perhaps come up with a new creative name for this system. YThanks for your time.
Charles, I’m sorry you feel that way, but calling this a drip system is a standard that is being used all over the country including by many Agricultural University extension agencies. I feel it is an accurate description of what the system is and does.
Geesh… Who _cares_ what it is called? What is important is what it does: use water efficiently to irrigate a garden. I experimented with soaker hoses, in earnest this year, and have been doing this for the past several years for fruit trees, rhubarb, raspberries, etc. I FINALLY learned HOW to correctly use soaker hoses (after finally reading the hosing which I previously ignored (like most / all people)), which is integral to Rick’s stem: LOW pressure. Previously, I was not adjusting the pressure and the first third of my soaker hose “over” watered stuff and the end of the soaker hose barely got any water. The real advantage of PVC pipe, particularly if the holes are “up” instead of facing down is one can easily see how much water is being released — which one cannot really see with a soaker hose. Also the length of a soaker hose presented additional issues, but if I would have used really low pressure that would probably not have been an important issue. My issue with a soaker hose and (perhaps) Rick’s system is that it seems water goes DOWN, with not enough lateral wetting. This resulted in most of my row crops not getting enough water and having to wait 3-4 weeks for stuff to germinate, and then grow. While this has been an unusually bizarre gardening year, I am just astonished at what has happened. Some seeds were sitting the ground for 3-4 MONTHS before germinating. I rarely hoe; I pull all my weeds out by hand. That allowed me to see these tiny plants. Additionally, for example, four of the dill seeds germinated and the tallest (only ONE plant), after four months, is barely 18″ tall. My arugula grew like gang-busters (which hardly ever happened before) and my spinach (which has ALWAYS sprouted well) _might_ have been 3.6% germination — and all plants are only less than 2″ tall. My carrots grew v e r y slowly for the first six weeks, now they got their act together and are “normal” height (for end of July). My beets mostly germinated, but after 4 months, ALL are less than 1″ tall. My tomato plants, started from seeds in (my) greenhouse and transferred outside in mid May (Reno NV) are anywhere from 6″ to 18″ tall and just now starting to blossom. What is going on? I then pulled up all my soaker hoses 6 weeks ago and started broad sprinkling my 30×40 garden. THAT seemed to turn things around; it also made it considerably easier to pull weeds! However, I am wondering if my garden soil is screwed up, but that seems like a long shot, no matter how rational it would appear. I tried fertilizer and my pole beans went from yellowish to bright green. My cucumbers have been blooming for 3 weeks and I have yet to see any fruit. I have two beehives that I confirm my bees are pollinating the plants; my butternut squash started developing “little” fruit within a few days of the blossoms opening. Bottom line is I need to test my soil to consider the importance of that variable. Then, next year, I will be adding alot more organic material (grass clippings, “clean” shredded paper, etc.; I added about 4 cubic yards of sand on my average garden soil this spring) and till this organic stuff into the soil. I will also likely add at least 2″± of “new” topsoil. Then I will plant my garden and water with a sprinkler until seeds germinate and then try the PVC system. I can only complain or offer comments about it only if I have tried it.
It’s a great drip irrigation system there!
I am wondering about the effects of the sun light on the pvc pipes. Do you have a method for sunlight protection? Those pipes will be sitting out in the garden for a few months and the UV light will probably damage them over time. You have any tips on that?
All of my pipes are 8 to 10 years old and are still going strong. Most of the summer they are under the shade of the crops they are watering so the sun exposure is not as much as you would think.
Thank you for the info! One question….what part of the pipe do you drill the holes? Top, bottom or side?
Monte, Because the pipes are round there isn’t really a top, bottom or side. Just drill the holes in a straight line on the same “side” of the pipe. I then turn the holes down so that the water stream or drip soaks into the soil directly in the root zone of your plants.
May be I can get my son-in-law to build a system for me.
Ms. Norma, believe me, you can do this. I’m a Mom who plays with PVC pipe like tinkertoy. Don’t let your boy have all the fun.
would drip tape be less expensive and easier to run? and also have you ever used row plastic for your plants and irrigation?
Brandon, I would have to price the drip tape to see how it compares. And I am not familiar with “row plastic”. Could you please describe for me?
I believe Brandon is referring to the way commercial vegetable farmers irrigate their fields using a specialized row plastic, which irrigates as well as acts as a weed barrier.
Great system! My sister-in-law inherited a underground drip system on her property and I always thought it was the best thing ever! I need to seriously consider doing this!
Hope to see you again at the Homestead Blog Hop tomorrow.
I’ve seen a few underground systems like that. Very cool idea! We could never pull it off because our water comes from a secondary source and isn’t very clean. So we end up having to clean out many of the smaller holes part way through the year. We couldn’t do that if they were buried.
this is without a doubt the best idea ever!! You totally win the internet for this one 🙂
Thanks Heather, this post has been our most read post ever!! It’s awesome to have so many readers!
What a great informative and helpful post, I am passing this onto my husband. Thanks for sharing this at Good Morning Mondays. Blessings
Glad you liked it!!
Great drip system. Hopefully I can talk the hubby into building one for me this spring!
Thanks for linking up with Green Thumb Thursday. I hope you join us again this week!
Lisa
Would there be enough pressure to do this from a rain barrel?? Or are there modifications that can be made to create enough pressure for this to work from a rain barrel? I love the PVC drip irrigation idea for our smaller sq foot garden, but I haven’t seen any methods that use a bucket or barrel rather than a hose.
Gina, great question!! Pressure is always going to be an issue from a rain barrel. But I believe you would be just fine with a smaller application. So if you kept your pipe lengths to only 8 foot sections (or smaller) and you set up a distribution system that allows you to turn the water on to only once section of pipe at a time I think it would work great! If you would like a little more specific advice why don’t you send me some photos of the garden and lets see what we can come up with!! Email me at rick@ourstoneyacres.com.
We made a PVC drip irrigation from our rain barrel with great success! I will email you the pics and specifications in case you want to add any bit of that to your video for advice to those wanting to do a rain barrell.
Gina, Thank you that is awesome. Please send me those pictures and I will include a section in my new video!! Send them to rick@ourstoneyacres.com
We have the garden area ready to plant (onions are in but still a bit cool for other stuff) so we are in the process of getting this done as well. We have a pretty big garden area (80′ long and 60′ wide) so it’s going to be a job but I think it will be worth it. Thanks!
Awesome Vicki!! In a couple of weeks I will have a video course on the PVC system ready. That may help as well. One suggestion I would give you on that big of a garden area. Be sure to use 3/4 inch PVC pipe and I would consider dividing the garden in half with a main water line. Then run your pipes from the center. That will make them only 40 feet long. With 80 foot lengths of PVC you will have a really hard time getting the water all the way to the end of the pipe. Breaking them into 40 foot sections will make for a much better system. 80 feet is just too long!!
Please remember that a lot of people in northern areas with freezing temps all winter read your page. Northerners have a lot of different situations to deal with and need advise as well. Consider Alaska please!
Tim, I’m happy to help. We have some tough winters but nothing like yours I’m sure. Do you have a specific question related to the PVC system and cold weather that I can try to answer??
We have about a 50ft x 20ft garden that we just did this for thanks to finding your post! We’ve got 3 zones so to speak, and I’m ridiculously excited about garden watering this year. We live in MN and definitely get extremely frigid temps. Would it be okay for the PVC to lay in the garden all winter if we blow out any moisture, or should we dissemble for garage storage do you think? (Garage is probably still below freezing)
Heather, great question. Thanks for reading. You really don’t need to worry about “blowing” the pipes out. Just take them apart and tip out any water and then stack them up some where in your garden for next year. They will be just fine. Although the pipes may last a few years longer if you store them indoors in the winter.
To increase Sheerwater pressure from a Rainbarrel you could use a small water fountain pump from your local garden store
If I use the pvc drip irrigation can I still use boxes for weed control and what advice would you give me in using both?
Bekah, My drip system is used in a flat bed garden and I haven’t personally used a PVC system in a box garden. But I have see them used before with success. I just googled:using pvc for drip irrigation in box gardens. And found a bunch of images that show PVC being used in Boxes. That might be a good starting point for you. I am adding a large grow box to my yard this year 10 x 15 and I will be using PVC in that box. Once I’ve had a season under my belt with that set up I will update this post and my video course with results!!
I have an informal English flower garden with a mix of roses, annuals, and small shrubs. I can’t seem to
reach all of them with my present use of plastic tubes and I have to adjust the sprinkler heads constantly. There has to be an easier way.
Jorge, PVC systems may not be the best choice for a more formal flower garden as the pipes would be unsightly. Have you tried the soaker hoses? They are usually dark brown or black so they don’t stick out as much. You could run them to all of your plants for a good soaking!
I had a similar question about ornamental watering. Would it be out of the question to paint the PVC a “mulch brown” color to hide it better? Or would that in some way prevent it from functioning properly? Thank you so much for this article, this is going to save us so much time on our veggie garden!!
Carissa, Great question! Something I hadn’t thought of. If you can find a paint that will “stick” to PVC then I don’t know why you couldn’t. I would suggest that you paint before you drill the holes, that way you aren’t painting them shut. You might want to consider other options for flower beds though. The kit drip systems are darker colored and would show up less. Also soaker hoses work well in flower beds. In both cases the added cost might be worth the trouble you would have to go to paint the PVC.
Great advice for me to mull over! Thanks! Oh, side note, I’m pretty sure I have seen some tutorials floating around the web on spray painting PVC to use as curtain rods (I think it was with rustoleum but I could be wrong), so if anyone decides to go the painting route, maybe google PVC curtain rods for a paint suggestion?
I also have a similar question. Would it work to use a flexible PVC pipe, such as pond tubing? You can buy 100 feet of 3/4″ diameter pond tubing for about $66. I’m wondering if there would be any issues with a flexible pipe getting twisted and the holes not lining up, etc.
I’m also wondering if the PVC fittings you mentioned would work with this type of tubing.
Here’s a link to some on Home Depot:
https://www.homedepot.com/p/HYDROMAXX-3-4-in-Dia-x-100-ft-UL-Sizing-Black-Non-Kink-Corrugated-Flexible-PVC-Pond-Tubing-1202034100/310812641
I have never tried this type of flex piping so I can’t speak to how it would work. I’m sure the fittings would not work. If you want flexible tubing then you should just go with a traditional drip system.
Great idea! I attempted a similar idea last year with old garden hoses (hubby has a bad habit of mowing my hoses). It didn’t work very well at all, but I think I’ll try a section with some PVC this year and see how that goes. Thanks! 🙂
Thanks Melanie!! Let me know if you have any questions I can help with!!
I just happened on this site. I have been driving big trucks for 48 years and found this site parked along I-335 here in Illinois. I am really enjoying this site and especially this info when using PVC pipe. WOW! Makes complete sense to me to only water the actual plant and not the whole garden area. Have a Blessed Day.
This is a brilliant idea!! My friend and I are starting a garden this year and we’ve been mulling over irrigation ideas since its been so dry this year. Question though, our garden is approx 20′ x 56′, I want to just have a main line running down the length of the garden and then 20′ pieces down each row. For the 20′ lengths, would you recommend 1/2″ or 3/4″ pipe?
Lauren,
Great question!! For the main line I would for sure use 3/4″ pipe, you need the extra volume in the main line. 1/2″ would be fine for your 20′ lengths, but that is about the max distance I would take 1/2″, any thing further than 20 feet i would go with 3/4.
I can’t wait to try this! I just got back from buying all the pieces for my 4×8 bed. Can I make the system in a continuous loop or is it better to cap the ends? Thanks for the Great post!
Cathy,
Most of mine are such long lengths that I need to cap the ends. The only thing I would worry about with a continuous loop would be water pressure, and weather there would be enough through the whole system. PVC is so cheap that I would say give it a try, if it works Awesome! if it doesn’t your only out a few bucks! If you decide to do the continuous loop I’d love to hear back on how it works. I’d even love a few photos that I could add to both this post and my video course.
Great write up Rick….I have been thinking about putting in some form of irrigation for a couple years. I’m getting tired of dragging hoses and perhaps this is the year. My garden is 48×20 ft. and is very flat. I was planning to make a 48 ft. main line with a tap off the main for each row in the garden. I usually plant rows 2 or 3 ft apart so there would be a bunch of T’s on the main. Each tap would have a valve so that I can turn any particular row on or off. I also considered laying it the other way with a 20 ft main and a 48 ft rows but I thought the rows might be too long. A couple questions;
When you place the lines along the rows they are facing down. Do you raise them up so that the dirt does not plug the holes? or does the basin around the plants act as a support to keep them up out of the dirt?
Do you run the system 24/7 and just let it drip? or do you turn it on/off. How long do you run the drip for a given row?
I assume the system does not have a very high flow rate. I was wondering if that would make the well pump cycle on and off?
Thx for the help
Ron
Ron, great questions, let’s break each answer down:
1. At our bulk crop garden we have rows that are 60 feet long and they do fine, so 48 shouldn’t be a problem. BUT use 3/4 inch pipe not 1/2.
2. I face my pipes down and let it soak into the ground that way. That does risk an occasional hole drilled in the ground if I have the pressure to high, but it not a big deal. BUT I have a neighbor that has a very extensive PVC system that he uses to water a very large garden (like 3/4 of an acre). He points all his holes up and they do fine. So, try out both ways and you decide which you like best!
3. The longest I let any setting run is about an hour, but many run less than that. You will be surprised how much water this low pressure system puts out. Depending on how big your holding tank is, I would assume it is going to cycle the well pump.
I hope that helps!!
Hi. So do you let this run for an hour per day or an hour per week? And this is an incredibly awesome post by the way. Extremely helpful!
Curtis, it really depends on the crop and the weather. Usually an hour or less does a good soaking and that will be all I need for at least 3 days maybe more. I NEVER water everyday. watering that often promotes weak plants with shallow roots. You want to water deeply and infrequently to promote deep root growth and strong plants. That is one of the big advantages of the drip system. It water deeply so you don’t have to water as often.
This is sick a great idea! My husband and I are planning on trying it out for our garden! Would it be okay to put mulch on top of the PVC piping as a way to cover it?
Mulching would be fine. The only problem I would see is putting mulch on top of the pipes would make it hard to tell if one of the holes is plugged. Besides that there is really no reason why it wouldn’t work.
Can drip emitter fitting be used with the pvc pipe to help get the water more even.
That is something I have never tried. But I think the answer would be no. those emitters are designed to go into that flexible poly pipe I don’t think they would go into the more ridged PVC.
Hi, Mr. Stoney, would you use the PVC drip system for lettuce?
I usually plant my seedlings 18″ apart (because they grow that big) and use sprinkler tape.
Of course, that’s wasted water, but as a starting commercial planter, I want to set up a system I’m not going to touch for a while.
Your thoughts, please! Thanks!
Allistair,
First off, 18 inches!! Wow those are some big lettuce plants! What variety are you growing?
Second, I use my PVC system for EVERYTHING; all vegetables, strawberries, raspberries and blackberries. But I’m using it in a garden application not commercial, so the longest lengths I have are 25 feet. But I have used longer lengths before at another garden.
With lettuce I usually space my plants about 6 to 8 inches and treat them as a row crop. The spacing for the holes in the PVC pipe is at 6 inches.
If you are going to space that far apart you could easily just drill holes every 18 inches and plant where the drip hole is. One thing to keep in mind, I have found that I can only get decent watering with PVC at a max length of about 60 feet. In fact maybe even a little less than that. So if you are going to use this system in a commercial application you may need to keep your rows at 50 feet or so. With spacing at 18 inches that may not really be the case, but on my pipes that are spaced 6 inches, 50 to 60 feet is really the max effective length. And at that length I have to turn the water up pretty high to get it all the way to the end, so the pressure is REALLY high (higher than I’d like) in the first 15 feet. I’d suggest you buy 5 or 6 – 10 foot lengths of 3/4 PVC, drill the holes and test it out (total investment of around $15) before you switch your whole operation to this system.
Sir,
Well, first off, I’m in Trinidad & Tobago, the tropics, and we have lots of sunlight right thru the year.
Secondly, in addition to chicken manure incorporated into the soil, I follow a regime from seedling stage that ensures that I get crops in 21 days.
Next, watering is no problem usually, since I have two ponds (one’s a hole, really, just about 20′ across and 10′ deep, with a few tilapia in there…the other is 140′ wide and 22′ deep, so you know I’m not running out of water soon).
I grow an Iceberg variety, but I’m switching to Eden. The Iceberg were touching each other at 3 weeks on a 12″ spacing. I didn’t like that happening, so I’m going to 18″ now.
I’ll send some pics next harvest in a couple weeks.
Regards,
Hi
Have you tried the 3/4″ PVC drip system on fruit trees? I have semi-dwarf and keep them 5-6′ tall. If I put a drip hole on each side of the tree at a safe distance and run the water for an hour, would that be enough water? Obviously I could test it out but hoped you had the answer before I go through all the work and find this system is not suitable for fruit trees.
Donnis, PVC systems work great for fruit trees. It is hard for me to tell you if an hour would be enough. That will really be based on your soil type and the weather conditions. Set the system up and let it run and experiment. With fruit trees you want to be able to give the roots a good deep soaking drink about once a week, again depending on weather and soil. You may also want to consider 2 water lines with a couple of holes on either side of the tree so that all of the root zone gets water.
Would PVC pipe last all year round outside in the garden if you drain the water out to keep it from freezing in the winter in Colorado?
It will be fine! We keep ours outside all winter and I think our winters here in Utah are pretty similar to yours.
Thanks for your info. We started this process without reading/watching any tutorials and came to the conclusion we drilled too many holes bc the water pressure only makes it to the 2nd section and questionable at that.
My garden bed is an L shape with 3 sections of 12 feet for a total of 36′ long and then the “l” is formed with another 12′. The width is 3.’ I was wanting one PVC pipe line down the middle. Thoughts/suggestions on how to make that happen?
Mandy,
I’d love to help but I’m having a hard time picturing your layout. Would you mind emailing me some photos, or maybe going to my facebook page and up loading? That way i can see what you are talking about.
Also my video course may help. If you click the link in this post it is only $10.00
how can i convert an existing sprinkler system to the pvc method? can i user risers and connect the pvc pipes in place?
I’m not sure I’m following. If you want to send a couple of photos or a diagram I can take a look. Send them to rick@ourstoneyacres.com
That will work….I plan to do the same thing. I plan to remove one of the sprinkler heads, attach an elbow and pvc pipe to bring the zone feed up to the surface, and then plumb it over to the drip system.
Some sprinkler systems use small rubber hoses as extensions to some of hte heads. These small hoses may restrict the water flow. Best to go all the way back to the 1in underground plumbing and attach it there.
At the end of the year I blow out my sprinkler system to prevent freezing. You might need to disconnect the drip system first because water in the drip pipe will back feed into the underground plumbing of the sprinkler zone. Just disconnect it and blow out as usual.
Ron
This looks like an excellent system. I have the soft drip irrigation pipes, with the drippers under the surface of my mulch. Problem is, the joints often blow off if I turn the water pressure up a little too high.
Think I might have to implement on of these for next Spring 🙂
Steve
I am super excited to see this article. My husband and I are going all in on a large garden next season and and this will help tremendously. Since we are just learning, it never occurred to me to build something like this at home. My husband is pretty handy and so he now has a project! Performance punishment:-) Thanks for sharing!
Interesting write-up Mr. Stoney. Can a PVC drip system works for potted(poly bag) plants garden. I just started planting 20 young fig plants and looking for suitable drip irrigation syytem.
Dino,
Yes, you could make it work. And it would be your cheapest option. But for the bags you might find the the drip systems with the tube emitters to be a little easier to use. With PVC any time you have any slope in the pipe it causes problems, so putting the pipe on top of bags might cause strange angles that would cause pressure issues. I’m not saying you can’t make it work, but you might find other systems a bit easier in this case.
I was thinking of doing a gravity feed from 250 gallon totes on a 30×40 garden but would there be enough pressure to do int effectively. I would be splitting the garden into probably 4 areas. or would i need a pump, and if so, got any ideas as to what kind and such.
Dan, I don’t have any direct experience with gravity fed systems. I have seen them done before and they worked well, but they were small systems. The one I am specifically thinking of had one 50 gallon barrel that watered a bed that was about 4 x 15 and it did well. You don’t need a ton of pressure to make a PVC system work and it seems like the weight of 250 gallons should be enough especially if you are breaking the garden in to 4 smaller zones. But not having any experience I’m only guessing.
for sloped Gardens, all you have to do is make sure the source of the water is up hill, and install gate or ball valves on the PVC pipe In several places as it goes downhill. The places that get too much water, the downhill places, you just need to tighten the valve closed a little bit to restrict the water going down there, which will increase the amount of water on the upside.
since we don’t blue the PVC, you have all sorts of room for reconfiguring on these for the best flow.
My vegetable garden is 20ft by 8 ft would you recommend putting the main line down the 20ft and branch of 8 ft sections or the opposite way
Also if I ran main line 20ft should I be 3/4
20 feet is not too long. You should be able to get away with just 1/2 in pipe if you want. But if you are thinking of expanding at any time I would use 3/4 so you have more capacity for the future. If it were me I would make the 8 foot section the main line and then run the branches down the 20 foot length!
I love the idea. I’m using a version of this to water some trees on my property line that otherwise don’t get watered consistently. Mine is 50 ft long, with a gradual slope. I’ve found that first few trees don’t get water because it runs to the lower point (there is too much pressure at the bottom).
My question – do you think larger holes on the higher side of slope would help? Or any other ideas?
It is a gradual slope, but over that distance it’s not working quite right. Thanks!
Matt, that is the one draw back of this system. It doesn’t deal well with slopes. Smaller holes on the down hill side with larger at the top may help. You might also find that turning the holes to point up on the down hill side and down on the up hill side might also help (that’s one to try right away). Other suggestions that I have seen for dealing with slopes is adding a ball valve mid way down the line. Then you can partially close that valve causing more pressure “up stream” from the valve and helping to keep the pressure up on that up hill section. I haven’t tried this one myself, but it could be worth a try and would also be a pretty cheap and easy thing to test.
I’ve been pondering using drip irrigation on my garden. My rows are about 36′ long and I’ll need approximately 13 rows. The problem is my garden is 300′ from the house which really drops the water pressure. Luckily, it’s downhill from the house. Will this system work with 3/4″ PVC and 1/16″ holes?
You won’t be able to run 13 rows at one time. The most I have been able to run at 25 feet is 3. So you will need to set up zones. If you are worried about low water pressure I would start out with small holes and get bigger if needed. I would think 1/16 would be okay.
Good idea! My layout is one row of peppers, one row tomatos, two okra, one squash, two rows pintos, two peas, the rest melons. I could install some ball valves and alternate. Your Udemy course was great! I’m going to purchase the drip irrigation vid! That should help get me started with my system! Thank you sir!
Yes, ball valves are the perfect solution!!
When you are talking about a 25 foot bed, how many rows of pipe do you have the water going through at a time?
Sorry, you answered my question in the last post.
Usually 3, but some times only 2. I have found that is about the max I can have connected together and still get the water to the ends of all the pipes.
Many thanks for all the great drip irrigation information.
I’ve put in a trial 3/4″ pipe across a 22′ narrow garden in front of my house, and it’s working well.
I’m going to convert all my 10′ x 4′ garden beds to this system, probably with 3 (or 4) rows of pipe in each – my understanding from what I’ve read here that 1/2″ pipe will be big enough for those?
We also have a long straight flat driveway with very narrow gardens down each side.
The driveway is about 120′ long. To water along here, do you think water would get all the way along a single 120′ length of 3/4″ pipe (with holes/plants spaced 12″-16″ apart)?
Your thoughts will be much appreciated.
Sheryl The longest I have ever tried with PVC is about 70 feet. And even at that, I had some real problems towards the end of the line. I think 120 feet is too much and you need to come up with a way of dividing that into 2 or even 3 segments.
Many thanks for your reply and advice. Much appreciated.
That’s a long stretch! You might need a second pipe running along side and feeding water into your drip pipe from both ends to even out the pressure.
I am going to try going across my rows instead of with the rows as I am on a good slope.
Great informative post.
I used this article to make a $20 irrigation system in a couple hours for my small garden. I had been using the sintered hose MiracleGro system, which works well but soon develops leaks and is difficult to repair.
For efficiently drilling the 1/2” pvc tubing, I made made a gauge from an 8” piece of 3/4” tubing, split lengthwise on the bandsaw. I drilled the 6” spaced holes on the gauge, then fit one of the holes with a bent paper clip. Moving to the long 1/2” tubing, drill your first hole, then pop the wired end of the gauge into that hole, and use the hole in the other end of the gauge to drill the next hole. Move the gauge on hole ahead and repeat.
Rob, this is a great idea! Would you mind sharing a photo of the jig that I can share with others?
It is a very useful blog and very important information about Mulch.
Hi! I had a nice little 1/4 tubing irrigation system in my raised bed until the rats ate my tubing. I decided to do a PVC system. I am not a plumber, and this is my first PVC irrigation system. I have a water hose on a orbitz timer. I buried the hose about 70 feet up to my raised bed and then used 1/2 PVC to build an irrigation system. I added some Mister/sprinkler heads to the PVC lines instead of just the drilled holes because I wanted at least a 1 ft spray range. I don’t have enough water pressure. I added a booster pump near the water faucet but it was not enough. I dont have electrical at the garden site. Any suggestions to increase water pressure?
I’m sorry, if the booster pump didn’t help then I don’t really have a suggestion. My system is a low pressure system so I don’t need to worry about spray range.
Great work! This post has inspired me a lot. Thanks for the motivation!